If you’ve been Googling how to install kitchen sink faucet and drain because a quote from a plumber made your eyes water, good news: this is one of the most doable plumbing jobs in the house. You don’t need to sweat any copper, you don’t need a permit for a like-for-like swap, and the two systems — the faucet on top and the drain underneath — are actually independent, so you can tackle them one at a time. Below is the exact order of operations we recommend at fransiton, plus the specific torque, sealant, and clearance details that separate a leak-free install from a Saturday-night puddle.
What tools and parts do I actually need before I start?
You need a basin wrench, channel-lock pliers, plumber’s putty, PTFE (Teflon) tape, a bucket, and a flashlight — plus the new faucet, a drain assembly, and two supply lines if yours are old. That’s the whole list for 90% of kitchen installs. Everything else is nice-to-have.
The single most important tool is the basin wrench. Its long shaft and pivoting jaw reach the mounting nuts hidden up behind the sink basin where no normal wrench fits. Trying to do this job without one is the #1 reason people give up and call a pro. If you’re not sure what belongs in your kit, our breakdown of the exact sink faucet install tools you actually need walks through each one with photos.
Here’s the shopping checklist:
- The faucet — confirm the hole count matches your sink (more on that below).
- A drain assembly (basket strainer) — most kitchen drains are 3½” in the US; farmhouse and some imported sinks vary.
- Two braided stainless supply lines — measure the length from your shut-off valve to the faucet inlet and add 4–6 inches of slack.
- Plumber’s putty — for the drain flange (and the faucet base if it has no gasket).
- PTFE thread-seal tape — for any tapered threaded connections.
- A P-trap kit — if you’re reusing the old trap, buy fresh washers anyway; they’re pennies.
One quick sanity check on the supply side: the flexible hoses that run from your wall valves up to the faucet are the part most likely to be corroded or the wrong size. If yours look chalky or crimped, replace them now — read up on choosing a faucet supply line under the sink before you buy so you get the right connector and length.
How many holes does my sink have, and does the new faucet fit?
Count the holes in your sink deck first — this decides everything. Most kitchen sinks have 1, 3, or 4 pre-drilled holes. A modern single-handle pull-down faucet needs just one hole; a classic widespread or a faucet with a separate sprayer/soap dispenser needs three or four.
If your new single-hole faucet is going into a 3-hole sink, you cover the two extra holes with a deck plate (also called an escutcheon). If you’re going the other way — a 3-hole faucet into a 1-hole sink — you’re out of luck without re-drilling, which is a much bigger job on stainless or granite composite. Match the faucet to the sink, not the other way around. We cover the cover-plate question in detail in our guide to the faucet deck plate — the principle is identical for kitchens.
| Sink holes | Faucet type that fits | What you’ll also need |
|---|---|---|
| 1 hole | Single-handle, integrated pull-down/pull-out | Nothing extra |
| 3 holes (4″ spread) | Centerset, or single-hole faucet + deck plate | Deck plate to hide extra holes |
| 3 holes (8″ spread) | Widespread two-handle | Matching valve set |
| 4 holes | Faucet + side sprayer or soap dispenser | Accessory or a hole cover |
How do I remove the old faucet and drain without making a mess?
Shut off both angle-stop valves under the sink, open the faucet to release pressure, and put a bucket underneath before you disconnect anything. There is always trapped water in the lines and the P-trap — respect it and you stay dry.
Work in this order:
- Turn off the water. Twist both shut-off valves clockwise until snug. If the valves are seized or weep, that’s a separate fix — but don’t force a corroded valve to the point it snaps.
- Relieve pressure. Open the faucet fully so residual water drains out.
- Disconnect the supply lines at the faucet inlets or at the valves. A little water will dribble — that’s the bucket’s job.
- Undo the faucet mounting nuts with the basin wrench and lift the old faucet out from the top.
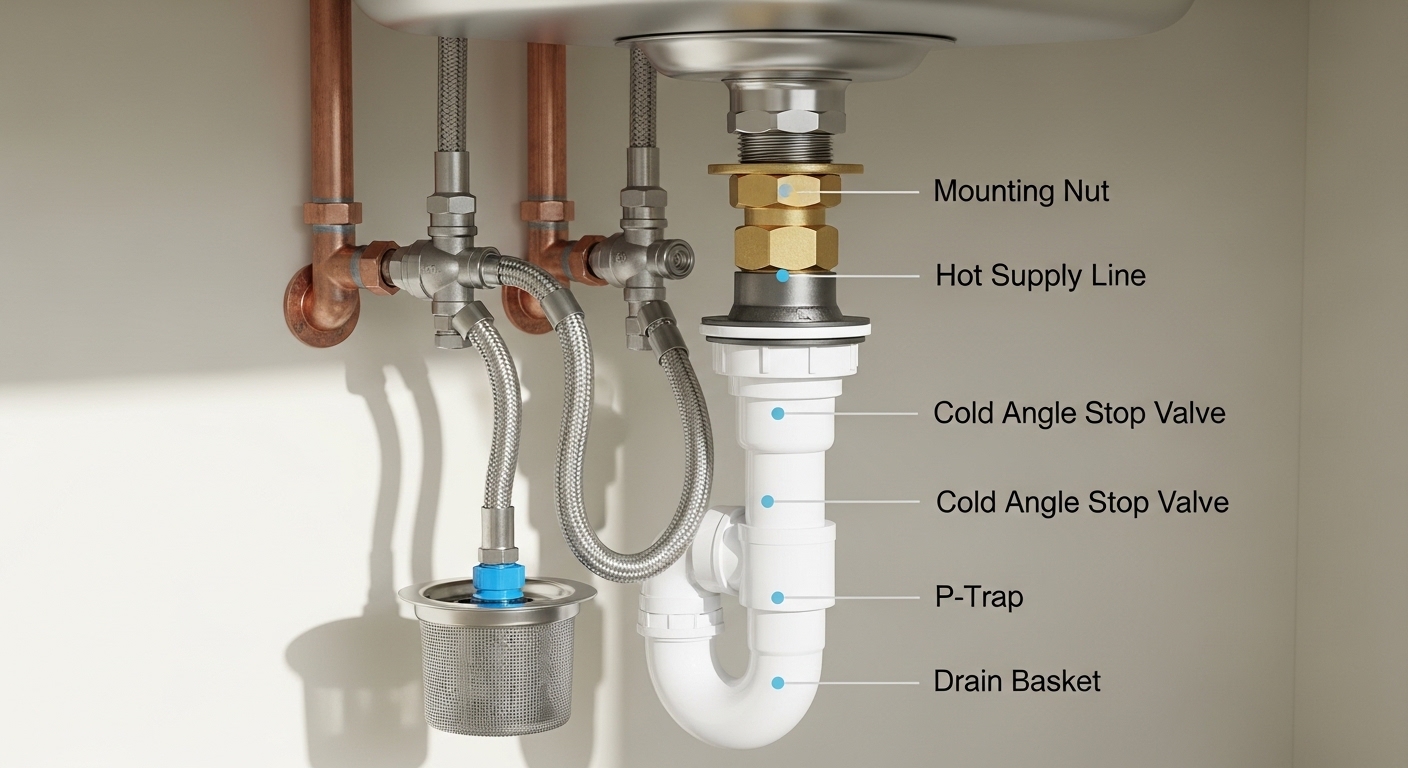
- Disassemble the drain. Loosen the P-trap slip nuts by hand or with channel-locks, drop the trap into the bucket (it’s full of gray water — this is the smelly part), then unscrew the large locknut holding the basket strainer and push the basket up and out.
- Scrape the old putty off the drain opening with a plastic scraper so the new flange seats on clean metal.
If your existing faucet was dripping and that’s what prompted the whole project, it’s worth knowing whether you even needed a full replacement — sometimes a cartridge does it. Our guide on fixing a dripping kitchen sink faucet covers when a repair beats a swap.
How do I install the new faucet step by step?
Set the new faucet into the deck holes, secure it from below with its mounting nuts, then connect the supply lines — that’s the faucet done. The whole faucet portion takes about 30–45 minutes once the old one is out.
The detailed sequence:
- Feed the lines and hose down through the deck. On a pull-down faucet, the spray hose and the two inlet shanks all pass through the mounting hole. Thread them carefully so nothing kinks.
- Seat the base. If your faucet came with a rubber or silicone gasket, use it dry — no putty needed. If it didn’t, lay a thin rope of plumber’s putty under the base to seal against splash water.
- Tighten the mounting nut from underneath with the basin wrench until the faucet won’t rotate. Snug, not gorilla-tight — over-torquing can crack a composite sink or distort a thin stainless deck.
- Attach the pull-down hose weight (if included) to the hose so the sprayer retracts smoothly.
- Connect the supply lines. Braided hoses use a rubber washer inside the nut, so they seal by compression — hand-tight plus a quarter turn with pliers. Do NOT add tape to those. Only wrap PTFE tape on tapered pipe threads (like a valve outlet without a washer).
- Match hot to hot, cold to cold — hot is almost always the left inlet as you face the faucet.
For a photo-by-photo faucet-only walkthrough, we have a dedicated piece on exactly how to install a kitchen faucet step by step. Bookmark it if the faucet is the only part you’re changing today.
How do I install the drain and P-trap so it never leaks?
Seal the basket strainer to the sink with plumber’s putty, tighten the locknut from below, then reassemble the tailpiece and P-trap with hand-tight slip nuts. The drain leaks in only two places — the flange and the slip joints — so get those two right and you’re done.
Step by step for the drain:
- Roll a rope of plumber’s putty about the thickness of a pencil and press it around the underside lip of the basket strainer flange.
- Push the basket down into the drain opening from the top. Excess putty will squeeze out — that’s exactly what you want.
- From below, slide on the rubber gasket, then the friction/paper washer, then thread on the big locknut. Hold the basket from spinning up top (a putty knife across the crossbars helps) while you tighten the locknut.
- Wipe away the squeeze-out putty ring on top with your finger. Clean line = professional look.
- Attach the tailpiece to the bottom of the basket with its own washer.
- Reassemble the P-trap: the trap arm goes into the wall stub, the U-bend connects to the tailpiece, and each slip nut gets a beveled washer. Hand-tighten, then a gentle quarter-turn with channel-locks. Slip joints seal on the washer, not on brute force — over-tightening cracks the plastic.
- If you have a dishwasher, connect its drain hose to the disposal or the dedicated tailpiece inlet and clamp it.
Note on sealant: plumber’s putty is the standard for the strainer flange because it stays pliable and is easy to remove later. Silicone works too but is permanent and messy. For threaded plastic-to-plastic trap joints, use nothing — the beveled washer is the seal. Only use PTFE tape or pipe dope on tapered threaded metal fittings.
How do I test for leaks and what if it drips anyway?
Turn the water back on slowly, let both hot and cold run, then fill the sink and pull the plug to test the drain under a full load. Feel every joint with a dry paper towel — it shows the tiniest weep instantly.
Run this test sequence:
- Open the shut-off valves slowly and check the supply-line connections at the valves and the faucet inlets.
- Run water 60 seconds hot and cold, watching underneath with your flashlight.
- Plug the sink, fill it, and release — this pressurizes the drain and P-trap the way normal use never does in the first minute.
- Wipe each joint with dry tissue. Damp tissue = a weep you’d otherwise miss.
Common fixes if you find a drip: a supply-line leak usually means the rubber washer isn’t seated — disconnect, check the washer, reconnect. A drip at the basket strainer flange means not enough putty or an uneven tighten — redo it. A slip-joint leak means the beveled washer is pinched or backwards — loosen, reseat, hand-tighten. If your new faucet’s pull-down handle feels wobbly after a week, that’s a mounting-nut issue, and our note on a loose kitchen faucet handle shows the two-minute fix.
Should I hire a plumber instead — and when is DIY a bad idea?
DIY is the right call for a straight like-for-like swap on accessible plumbing. Call a pro if your shut-off valves are seized, if you’re changing the hole count and need to drill a stone sink, or if you’re moving from a single to a double bowl and the drain geometry changes.
| Scenario | DIY? | Why |
|---|---|---|
| Same-config faucet + drain swap | Yes | No re-plumbing; 1.5–3 hrs |
| Seized/leaking shut-off valves | Maybe | Valve replacement means shutting the main; doable but a step up |
| New hole drilled in granite/composite | No | Wrong bit cracks the sink; irreversible |
| Single → double bowl conversion | No | New trap arm height and center-outlet geometry |
| Adding a garbage disposal | Maybe | Adds an electrical connection |
A realistic budget: a mid-range pull-down faucet runs $90–$220, a quality basket strainer $15–$40, supply lines and a P-trap kit under $30. So a full DIY faucet-and-drain refresh lands around $130–$290 in parts. A plumber for the same swap typically charges $150–$350 in labor on top of parts, which is exactly why this job is worth learning.
FAQ
How long does it take to install a kitchen sink faucet and drain?
Most DIYers finish a standard single-basin faucet-and-drain swap in 1.5 to 3 hours. Your first time trends toward the longer end, mainly because of the awkward reach behind the basin. Removing a badly corroded old drain or freeing a seized valve can add 30–60 minutes.
Do I need plumber’s putty or silicone for the drain?
Use plumber’s putty for the basket strainer flange — it seals immediately, stays flexible, and is easy to remove later. Silicone works but cures permanently and is messier to service. Never use putty on the threaded plastic slip joints of the P-trap; those seal on the beveled washer alone.
Can I reuse my old P-trap and supply lines?
You can reuse a P-trap if the plastic is intact and not brittle, but always fit fresh washers. Supply lines are cheap and fail with age, so if yours are braided-but-old or the old-style ribbed plastic, replace them — a burst supply line under a cabinet is a slow, expensive flood.
Which side is hot on a kitchen faucet?
Hot is the left inlet as you stand facing the faucet, cold is the right. If you accidentally cross them, you’ll just swap which way the handle means hot — easiest to fix by re-connecting the two supply lines correctly rather than living with a backwards handle.
Why is my new faucet dripping at the base after install?
Water pooling at the faucet base is almost always splash water getting under an unsealed deck, not a plumbing leak. If your faucet used a rubber gasket, make sure it’s seated flat; if it had no gasket, add a thin ring of plumber’s putty under the base. A drip from the spout itself instead points to a cartridge issue, not the install.
Do I need to turn off the water main, or just the sink valves?
For a normal install you only need the two shut-off (angle-stop) valves under the sink. You’d shut off the whole-house main only if those valves are broken, seized, or you’re replacing the valves themselves.
About the author: This guide was written by the fransiton fixtures team — installers and product specialists who spec, bench-test, and field-install kitchen and bath faucets year-round. We’ve done this swap on everything from thin builder-grade stainless to 60-lb fireclay farmhouse sinks.
Why trust fransiton: fransiton designs and sells kitchen and bathroom faucets, drains, and fixtures directly to homeowners. Our faucets are tested to ASME A112.18.1 / NSF 61 standards for lead-free waterways and cycle-tested valve cartridges, and our kitchen faucets ship with a limited lifetime warranty on finish and function — so if a mounting nut or cartridge ever fails, it’s covered. Standards and warranty details are on each product page at fransiton.net.
Pingback: Kitchen Faucet Parts Replacement: Which Part Failed, and Can You Fix It Yourself? - Fransiton
Pingback: What Is a Wall Mount Faucet Bracket, and Do You Need One for Your Sink? - Fransiton