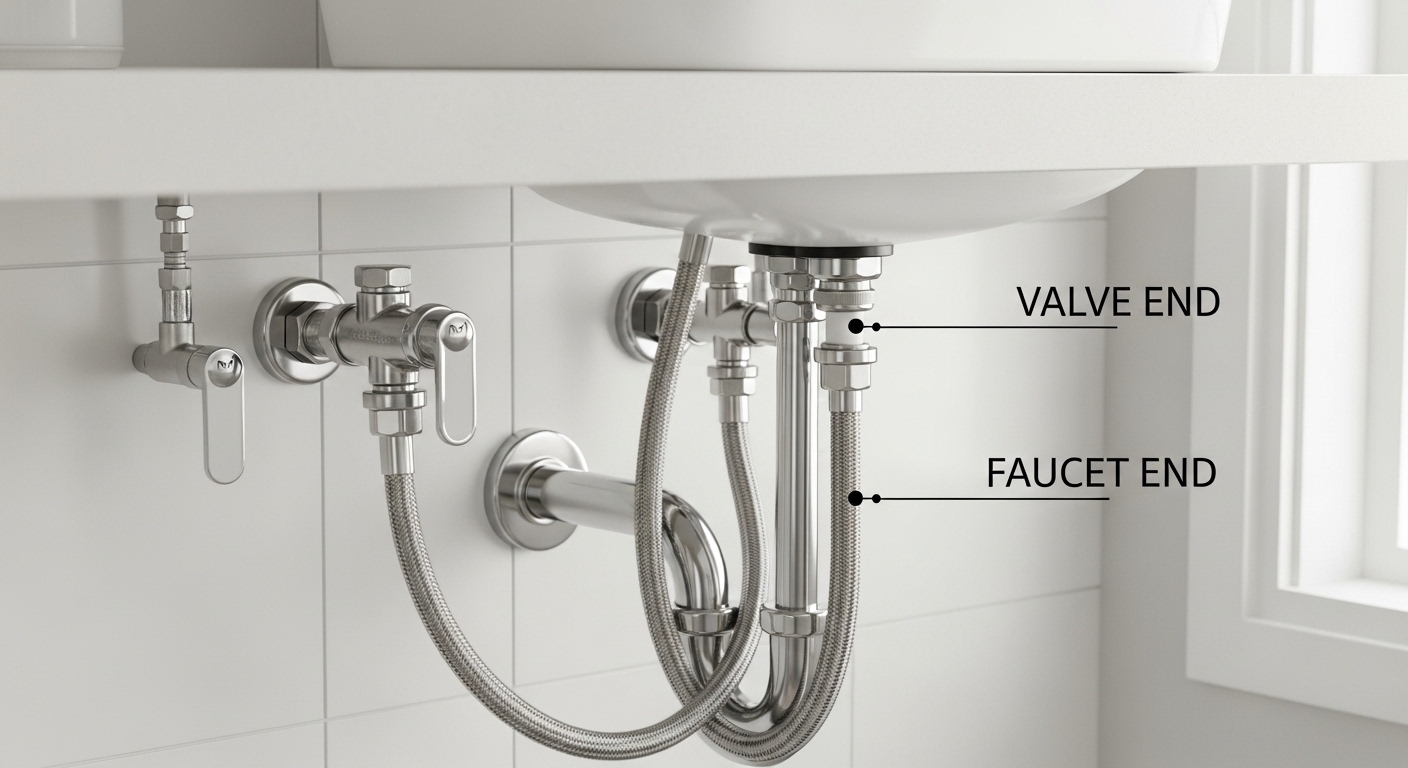
If you’ve ever crawled under your sink to fix a drip, you’ve met the faucet supply line under sink — those two thin hoses running from the wall valves up to the bottom of your faucet. They’re small, cheap, and easy to ignore, right up until one bursts and turns your cabinet into a wading pool. This guide answers the real questions people ask before buying one: what size do I need, braided vs. plastic, how long should it be, and how do I not get soaked while replacing it. No fluff — just the specs and the plain-English reasoning behind them.
What exactly is a faucet supply line, and what does it connect to?
A faucet supply line is a short flexible tube — usually 12 to 20 inches long — that connects your under-sink shut-off valve (the little football-shaped knob on the wall) to the inlet on the bottom of your faucet. One end grabs onto the valve; the other threads onto the faucet’s tailpiece. You always run two: one for hot, one for cold.
Think of it as the last few inches of your plumbing journey. The rigid copper or PEX pipe in your wall stops at the shut-off valve. From there, the water needs a flexible connector to reach a faucet that might wiggle a bit during installation or sit at a slightly different height. That’s the supply line’s whole job — a leak-proof, flexible bridge across a short gap.
Because it’s flexible, you don’t need to be a plumber with a pipe bender to install one. That’s exactly why they’ve become the standard. But “flexible” also means the material matters a lot, which is where most buying mistakes happen.
Braided stainless steel vs. plastic vs. PEX — which supply line is actually best?
For 90% of kitchen and bathroom sinks, a braided stainless steel supply line is the best choice: it resists bursting, handles heat, and lasts the longest. Plastic (PVC or poly) lines are the cheapest and fine for low-pressure or budget jobs, while coated PEX and vinyl lines sit in the middle. Here’s the honest comparison.
| Type | Typical Price (each) | Burst Resistance | Lifespan | Best For |
|---|---|---|---|---|
| Braided stainless steel | $6–$14 | Excellent | 8–10+ years | Most kitchen & bath faucets, hot lines, high pressure |
| Braided PEX / nylon | $5–$10 | Very good | 7–9 years | Cold water, tight budgets, DIY swaps |
| Coated/vinyl (poly) | $3–$6 | Fair | 4–6 years | Temporary or low-pressure use |
| Rigid copper riser | $4–$9 | Excellent (if fitted right) | 15+ years | Exact-fit permanent installs by pros |
The braid on a stainless line isn’t the part holding water — inside there’s a rubber (EPDM) or PEX core, and the woven stainless jacket wraps around it to stop the core from ballooning and bursting under pressure. That’s the key advantage: even if the inner tube fails, the braid usually contains it long enough to prevent a catastrophic flood. Plain plastic lines have no such backup.
My rule of thumb: never put a bare plastic line on a hot water connection. Heat degrades plastic faster, and the hot side is where you’ll see failures first. Spend the extra few dollars on braided stainless — it’s the cheapest insurance in your entire house.
What size faucet supply line do I need, and how do I measure it?
Most faucet supply lines use a 3/8″ compression connection on the valve end and either a 1/2″ female thread or a 3/8″ compression on the faucet end — but you must confirm both by looking at your actual fittings, not guessing. Getting the size wrong is the #1 reason people make two trips to the hardware store.
There are two measurements that matter: the connection size (the threads/fittings on each end) and the length. They’re independent, so check both.
- Valve end (bottom): Standard angle stops use a 3/8″ compression outlet. Occasionally you’ll find 1/2″ compression on older or utility valves.
- Faucet end (top): Many faucets have a 1/2″ IPS male tailpiece, so the line needs a 1/2″ female thread. Others, especially pull-down kitchen faucets, come with their own captive supply hoses ending in a 3/8″ compression that ties into your line with a coupling.
- Length: Measure from the valve outlet to the faucet inlet, then add 2–3 inches of slack so the line makes a gentle curve instead of a sharp kink. A kinked line restricts flow and cracks over time.
If your faucet came with hoses already attached (common on modern pull-downs and touchless models), you’re often just connecting those to the valve with a matching coupling rather than buying a full supply line. If you’re unsure how those two hoses join, our explainer on what a faucet supply line coupling is and which one to buy walks through exactly which coupling matches which threads. And if you’re doing a full swap, the step-by-step kitchen faucet install guide shows where the supply lines fit into the whole job.
How long should a faucet supply line be — can it be too long?
A supply line should reach from the valve to the faucet with 2–3 inches of gentle slack — long enough to curve without stress, short enough not to loop and coil. Yes, too long is a real problem: excess line coils against the cabinet floor, kinks, and can chafe or trap water in a low spot.
Common lengths sold are 12″, 16″, and 20″. For a standard bathroom vanity, 12″–16″ usually works. Deeper kitchen cabinets or garbage-disposal setups often need 16″–20″. When in doubt, measure with a piece of string first — run it along the exact path the hose will take, then measure the string.
The goal is a smooth, relaxed curve. If the line is bar-tight, it stresses the fittings every time pressure changes and will eventually weep at the connection. If it’s a coiled mess, it kinks. Aim for the Goldilocks bend: not straining, not looping.
How do I replace a faucet supply line without flooding the cabinet?
Shut off the valves, drain the pressure by opening the faucet, put a towel and a bowl under the connections, then unthread the old line and thread on the new one hand-tight plus a quarter to half turn with a wrench. Done carefully, you’ll lose maybe a cup of water — not a flood.
Here’s the sequence that keeps you dry:
- Close both shut-off valves under the sink (turn clockwise until snug). If there are no shut-offs, close the main house valve.
- Open the faucet — both hot and cold — to release trapped pressure and drain standing water. Leave it open.
- Position a towel and a small bowl directly under the connections. There’s always a little water left in the line.
- Unthread the old supply line — faucet end first, then valve end — using a basin wrench or adjustable wrench. Hold the valve steady with a second wrench so you don’t twist it loose from the wall.
- Thread on the new line hand-tight, then snug it with a wrench about a quarter to half turn past hand-tight. Overtightening cracks fittings and crushes washers — don’t gorilla it.
- Turn the water back on slowly and watch every connection for 60 seconds. A drip now means back off, reseat, and re-snug.
One pro tip: most modern braided lines have a rubber washer or cone seal built into the coupling nut, so you usually don’t need plumber’s tape on compression ends. Use PTFE tape only on tapered pipe threads (NPT/IPS), never on a compression joint with a rubber seal — tape on a rubber seal can actually cause a leak.
How often should I replace supply lines, and what are the warning signs?
Replace braided stainless supply lines about every 8–10 years, and plastic ones every 4–6 years — or immediately if you see any corrosion, bulging, rust bleed, or moisture at the fittings. Supply-line failures are one of the most common causes of household water damage, and they almost always give warning signs first.
Check yours twice a year when you’re already under there. Watch for:
- Rust spots or a white crusty buildup on the braid or nuts — a sign the inner core is weeping.
- Bulging or blistering anywhere along the hose — the braid is losing the fight against pressure.
- Green or blue corrosion at brass fittings — mineral-laden water is eating the metal.
- Any dampness at the connections that returns after you dry it.
- Stiffness or cracking in older plastic lines when you flex them.
Whenever you’re already swapping a faucet, replace the supply lines too — they’re a few dollars and you’ve got the cabinet open anyway. It’s the same logic as changing both hoses when you replace a washing machine. While you’re in there, it’s also a good time to inspect the deck plate and mounting; if you’re rethinking the faucet setup entirely, our guide to what a bathroom faucet deck plate is and whether you need one pairs well with a supply-line refresh.
Do I need special tools to install a supply line?
No — for most supply-line jobs you only need an adjustable wrench and, for tight spots, a basin wrench. No soldering, no glue, no threading machine. That’s the beauty of flexible connectors versus rigid copper.
A basin wrench is the one specialty tool worth owning: its swiveling jaw reaches up behind the sink basin where a normal wrench can’t fit. If you’ve ever tried to reach the faucet-end nut with a straight wrench and skinned your knuckles, you know why it exists. For a full rundown of what’s genuinely worth buying, see our breakdown of the sink faucet install tools you actually need — it’ll keep you from over-buying gadgets you’ll use once.
What Fransiton recommends for a reliable under-sink connection
At Fransiton, we design and test faucets and their fittings as a complete system — because a beautiful faucet still fails if the two-dollar hose under it does. Our recommendation for the vast majority of homes is straightforward: a braided stainless steel supply line with a rubber-cone seal, matched to your valve and faucet threads, replaced on a schedule instead of after a flood.
A few concrete buying guidelines we stand behind:
- Buy braided stainless for both hot and cold — don’t mix in a plastic line to save a dollar.
- Get the length that leaves a gentle curve, not a taut line or a coil.
- Confirm both end fittings before you leave the store; bring the old line as a reference if you can.
- Look for lines rated to recognized plumbing standards (such as those tested to NSF/ANSI and cUPC/IAPMO listings) so you know the burst pressure and material safety were actually verified.
Quality supply lines from reputable makers are pressure-tested well above normal household water pressure (typically 40–80 psi) and are certified for potable-water contact. That testing and certification — plus a manufacturer’s warranty — is what separates a line you can trust behind a cabinet wall from a gas-station-grade hose that fails in year three.
FAQ
Are all faucet supply lines the same size?
No. While 3/8″ compression on the valve end is the most common outlet, the faucet end varies between 1/2″ female thread and 3/8″ compression, and lengths range from 12″ to 20″. Always check both fittings and measure the run before buying.
Can I reuse the old supply lines when installing a new faucet?
You can, but you shouldn’t if they’re more than a few years old or show any wear. Since the cabinet is already open and new lines cost only a few dollars each, replacing them is cheap insurance against a leak you won’t notice until it’s damaged the cabinet.
Do braided stainless steel supply lines ever fail?
Yes — usually the inner rubber core degrades over time, not the braid itself. That’s why an 8–10 year replacement schedule matters even for premium lines. Corrosion at the crimped ends is the most common failure point, so inspect the nuts and collars, not just the middle of the hose.
Do I need plumber’s tape (PTFE) on a supply line?
Only on tapered pipe threads. Compression connections with a built-in rubber or cone washer seal without tape, and adding tape there can actually cause a leak. Use PTFE tape on threaded NPT/IPS joints, not on rubber-sealed compression nuts.
Why is my supply line leaking at the connection right after installing it?
Almost always it’s either an over-tightened nut that crushed the washer, an under-tightened nut, or a cross-threaded connection. Shut off the water, remove the line, inspect the washer and threads, then reseat it hand-tight plus about a quarter to half turn with a wrench.
How much water pressure can a supply line handle?
Quality braided stainless lines are typically pressure-tested far above the 40–80 psi found in most homes, often to several hundred psi burst rating. If your home pressure regularly exceeds 80 psi, install a pressure-reducing valve — high pressure shortens the life of every hose, washer, and fitting in the house.
Author note: This guide was written by the Fransiton fixtures team, drawing on hands-on faucet installation and testing across kitchen and bathroom product lines. Fransiton designs, manufactures, and quality-tests faucets and fittings, and we base these recommendations on real installs and standards-based testing — not marketing copy. Always follow your local plumbing code and the instructions that came with your specific faucet.
Pingback: Kitchen Faucet Parts Replacement: Which Part Failed, and Can You Fix It Yourself? - Fransiton