If you’ve been wondering exactly how to replace bathtub faucet pipes — the supply lines feeding your tub valve and the short “nipple” pipe behind the spout — the honest answer is that it’s very doable as a DIY job, as long as you can reach the pipes and you shut the water off correctly first. This guide walks through the whole thing in plain English: what tools you need, how to tell copper from galvanized from PEX, how to avoid the two mistakes that actually cause flooding, and when you should stop and call a plumber. We install and test tub fixtures for a living, so this is the same sequence a pro follows, just slowed down for a first-timer.
What exactly counts as a “bathtub faucet pipe” — supply line, nipple, or valve?
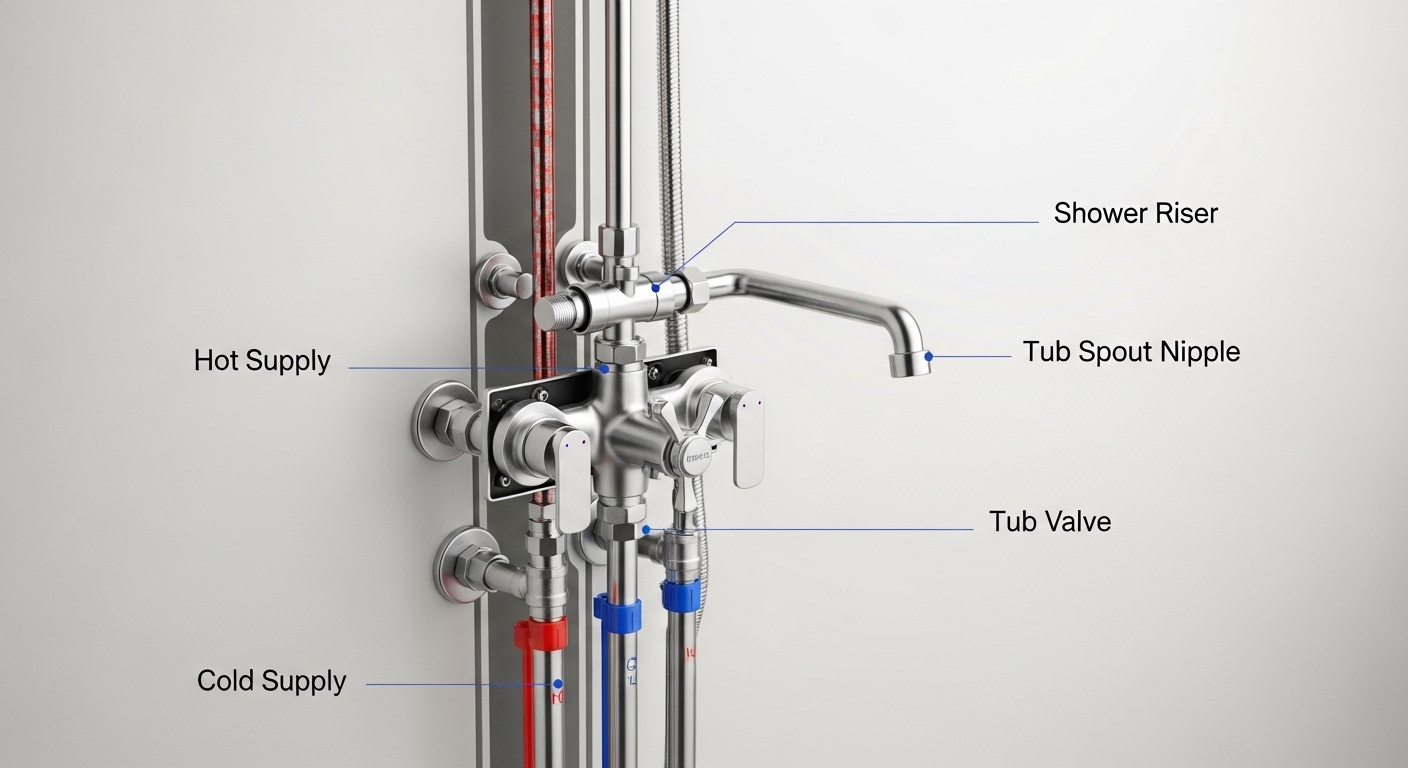
“Bathtub faucet pipes” usually means one of three things, and knowing which one is failing decides your whole job. The three are: the hot and cold supply pipes that run through the wall up to your tub valve, the short tub spout nipple that sticks out of the wall behind the spout, and occasionally the shower riser pipe going up to the shower head.
Here’s how to tell them apart without guessing:
- Supply pipes — the two vertical pipes (one hot, one cold) hidden in the wall behind the tub. A leak here shows up as water damage below the tub or on the ceiling of the room underneath.
- Tub spout nipple — the threaded pipe stub between the wall and the spout. If water sprays or drips right where the spout meets the wall, this nipple or its seal is usually the culprit.
- Shower riser — the pipe carrying water up from the valve to the shower head arm.
If your problem is really just water sneaking out behind the spout, you may not need to touch the supply pipes at all — that’s often a spout or nipple seal issue, and we cover that exact scenario in our guide on why a tub spout leaks at the wall and how to fix it fast. Replacing full supply pipes is a bigger job, so it’s worth confirming which pipe is actually bad before you cut into anything.
What tools and materials do I need to replace bathtub faucet pipes on a budget?
You can do a standard supply-pipe or nipple replacement for roughly $40–$120 in parts plus a handful of common tools. You don’t need a plumber’s full kit — you need the right handful of items and the correct pipe material to match what’s already in your wall.
Core tools:
- Adjustable wrench and channel-lock pliers
- Pipe wrench (for galvanized or stubborn threaded joints)
- Tubing cutter (for copper) or PEX cutter (for PEX)
- Deburring tool or utility knife
- PTFE pipe-thread tape and/or pipe joint compound (“pipe dope”)
- A bucket, towels, and a headlamp
- Propane torch, flux, and lead-free solder — only if you’re joining copper the traditional way
Materials depend on the pipe you’re matching. Most modern tub installs use 1/2-inch lines. If you’d rather skip soldering entirely, push-to-connect fittings (like SharkBite-style couplings) let you join copper, CPVC, or PEX without a torch — a big win for nervous first-timers working in a tight wall cavity.
Which pipe material should I use — copper, PEX, or CPVC?
For a bathtub faucet supply pipe replacement, PEX is the easiest and most forgiving for DIYers, copper is the most durable and heat-tolerant, and CPVC is the cheapest but the most brittle. The single most important rule: match or properly transition to whatever material is already in your wall, and never mix metals directly without a dielectric fitting.
| Pipe type | Typical cost (1/2″, per ft) | Tools needed | Best for | Watch out for |
|---|---|---|---|---|
| Copper (Type L) | $3–$5 | Tubing cutter, torch, solder OR push-fit | Longevity, hot-side runs, resale value | Soldering skill; higher cost |
| PEX (cross-linked) | $0.50–$1 | PEX cutter + crimp/cinch or push-fit | Easiest DIY, tight spaces, freeze resistance | Needs correct fittings; keep away from UV |
| CPVC | $0.50–$1 | Ratchet cutter, solvent cement | Lowest budget jobs | Brittle when old; cement fumes; cure time |
| Galvanized steel (old) | Replace, don’t reuse | Pipe wrenches | Nothing new — phase it out | Internal corrosion restricts flow |
If your house still has galvanized steel supply pipes, this is a great opportunity to transition to PEX or copper. Old galvanized lines rust from the inside out, which slowly strangles your water pressure and is a common hidden reason a tub “just doesn’t flow like it used to.”
How do I actually replace the pipes step by step without flooding the bathroom?
The flood-proof sequence is: shut off water, open a faucet to drain and relieve pressure, protect the tub, then disconnect, replace, and pressure-test before you close the wall. The two mistakes that cause floods are turning the water back on with a joint not fully sealed, and forgetting to relieve pressure so a fitting blows off in your hand. Follow these steps in order and you avoid both.
Step 1 — Shut off the water and drain the lines
Turn off the water at the tub’s individual shutoffs if it has them; if not, shut off the main supply to the house. Then open the tub faucet (and a lower faucet elsewhere, like a basement sink) to drain the pipes and release residual pressure. Wait until the flow stops completely — don’t rush this.
Step 2 — Get access to the pipes
Most tub valves are reached through an access panel on the back side of the wall (often in a closet or adjoining room). If there’s no panel, you may need to cut a small opening in the drywall behind the valve. Take a photo of the existing layout before you disconnect anything — it’s your reference for reassembly.
Step 3 — Remove the old spout and nipple
Slide or unthread the tub spout off. Twist the spout counterclockwise; set-screw spouts have a small hex screw underneath to loosen first. Once the spout is off, unthread the old nipple from the drop-ear elbow in the wall using a pipe wrench. If the nipple is corroded and snaps, a nipple extractor removes the leftover threads.
Step 4 — Disconnect and remove the damaged supply pipe
Cut out the bad section with a tubing or PEX cutter, or unthread it if it’s galvanized. Keep your bucket and towels underneath — even drained pipes hold a surprising amount of water. Measure the removed section carefully; your new pipe needs to match that length plus fitting depth.
Step 5 — Install the new pipe and fittings
Dry-fit everything first. On every threaded joint, wrap PTFE tape clockwise 3–4 times or apply pipe dope, then hand-tighten and snug with a wrench — firm, not gorilla-tight, since overtightening cracks fittings. For push-to-connect couplings, deburr and mark the insertion depth, then push until fully seated. If you’re soldering copper, clean and flux the joint, heat the fitting (not the solder), and let the solder wick in. A quality coupling matters here — our breakdown of how to choose the right faucet supply line coupling explains what to look for.
Step 6 — Pressure-test before you close the wall
Turn the main water back on slowly — a quarter turn, then wait — and watch every new joint with a dry paper towel. A slow weep shows up as a damp spot within a few minutes. If it’s dry after 10–15 minutes at full pressure and you’ve run both hot and cold, you’re good to reinstall the spout and close the access panel. Never patch the drywall before this test passes.
How long does replacing bathtub faucet pipes take, and what does it cost DIY vs. a plumber?
Expect 2–4 hours as a first-time DIYer for a straightforward supply-pipe or nipple swap, at $40–$120 in parts. A plumber typically charges $150–$450 for the same job depending on access and your region, with the bill climbing fast if a wall has to be opened and re-tiled. The DIY savings are real, but they hinge entirely on access.
| Scenario | DIY time | DIY parts cost | Plumber cost | DIY difficulty |
|---|---|---|---|---|
| Tub spout nipple only | 30–60 min | $10–$30 | $120–$200 | Easy |
| Supply pipe, with access panel | 2–3 hrs | $40–$90 | $150–$350 | Moderate |
| Supply pipe, no access (cut wall) | 4–6 hrs+ | $60–$120 | $350–$700+ | Hard |
| Full valve + pipes replacement | Half day+ | $120–$300 | $500–$1,200 | Pro-level |
The takeaway: if you have an access panel and you’re only replacing pipe (not the mixing valve itself), DIY makes a lot of sense. Once tile removal or valve-body replacement enters the picture, the math and the risk both shift toward hiring out.
When should I just call a plumber instead of doing it myself?
Call a plumber if the leak is inside a finished tiled wall with no access, if the valve body itself is cracked or the pipes are soldered into a tight assembly you can’t isolate, or if you find corroded galvanized pipe running through the whole house. Those situations turn a two-hour job into a demolition project, and a mistake means water inside your wall cavity.
Also stop and reassess if you can’t fully shut the water off, if the pipes are aluminum or an unusual size you can’t match, or if you smell mold or see rot in the framing — that’s water damage that predates your repair and needs proper attention. There’s no shame in it; even seasoned DIYers hand off jobs where the access is bad. If your underlying goal is upgrading the whole fixture rather than fixing one pipe, it may be smarter to plan a full replacement — our look at the Everstein Roman tub faucet for deck-mounted bathtubs and the piece on whether you need a shower system tub spout or just a shower head can help you decide what to install once the wall is already open.
How do I stop the new pipes from leaking or failing again?
The three habits that prevent repeat leaks are: seal every threaded joint properly, don’t overtighten, and support the pipe so it can’t vibrate loose. Most “I fixed it and it leaked again” stories trace back to a rushed joint or a wobbling, unsupported pipe hammering itself apart over months.
- Seal correctly. Tape on threaded connections, solvent cement on CPVC, proper crimp rings on PEX. Never rely on tape to fix a joint that’s cross-threaded — back it out and restart.
- Support the run. Secure new pipe to studs with proper clamps so water hammer doesn’t stress the fittings.
- Insulate exterior-wall runs. If tub pipes sit in an outside wall, foam pipe insulation reduces freeze risk — the #1 cause of burst supply pipes.
- Flush before final assembly. Run water through the new pipe to clear debris before reinstalling the spout, so grit doesn’t lodge in the valve.
If, after all this, you get a persistent drip at the spout rather than a pipe leak, that’s a valve or cartridge issue, not a pipe issue — our guide on how to fix a dripping shower faucet in under an hour covers that repair separately.
FAQ
Can I replace bathtub faucet pipes myself without any plumbing experience?
Yes, for a tub spout nipple or an accessible supply pipe, a careful first-timer can handle it in a few hours using push-to-connect fittings that skip soldering. The must-haves are the ability to fully shut off and drain the water and physical access to the pipes. If the pipes are buried behind finished tile or the valve body itself is failing, hire a professional.
Do I need to shut off the water to the whole house?
Only if your tub doesn’t have its own dedicated shutoff valves. Many tubs have local stops behind an access panel; use those if present. If not, shut off the main supply. Either way, open the faucet afterward to drain the lines and relieve pressure before you disconnect anything.
What size pipe do most bathtub faucets use?
Residential tub supply lines are almost always 1/2-inch (copper, PEX, or CPVC), and the tub spout nipple is typically a 1/2-inch threaded pipe. Always measure your existing pipe’s outside diameter and thread before buying, since older homes occasionally used non-standard sizes.
Should I use pipe tape or pipe dope on the joints?
Use PTFE thread tape (3–4 clockwise wraps) on threaded metal or plastic joints; pipe dope works too and some pros use both on hot-side connections. Neither is used on push-to-connect, soldered, or solvent-welded joints — those seal by the fitting or cement, not tape.
How do I know if the leak is a pipe or just the tub spout seal?
If water appears right where the spout meets the wall, it’s usually the spout or nipple seal, not a broken supply pipe. If water damage shows up on the ceiling or wall below the tub with no spout drip, suspect a supply pipe or joint inside the wall. Confirming which one saves you from opening a wall you never needed to touch.
Are push-to-connect fittings reliable enough for pipes inside a wall?
Quality push-to-connect fittings are rated for concealed use by most manufacturers, but many plumbers still prefer soldered or crimped joints for anything sealed permanently inside a wall, and some local codes require an access point for them. Check your fitting’s listing and your local code; when in doubt inside a wall, use a permanent joint method.
Author note: This guide was written by the Fransiton fixtures team, who install, pressure-test, and field-return tub valves and supply components year-round. We’ve replaced these pipes in everything from 1950s galvanized systems to modern PEX renovations, and the sequence above reflects what actually prevents callbacks.
About Fransiton: Fransiton designs and sells bathtub, shower, and kitchen fixtures built to meet recognized North American plumbing standards (such as ASME A112.18.1/CSA B125.1 and NSF/ANSI 61 for lead-free wetted parts). Our tub and shower fittings are pressure- and cycle-tested before shipping and backed by a limited warranty, so a pipe or fitting that fails under normal use is covered — always keep your receipt and register the product.
Pingback: My Tub Spout Moves Side to Side — Is That Bad, and How Do I Fix It? - Fransiton