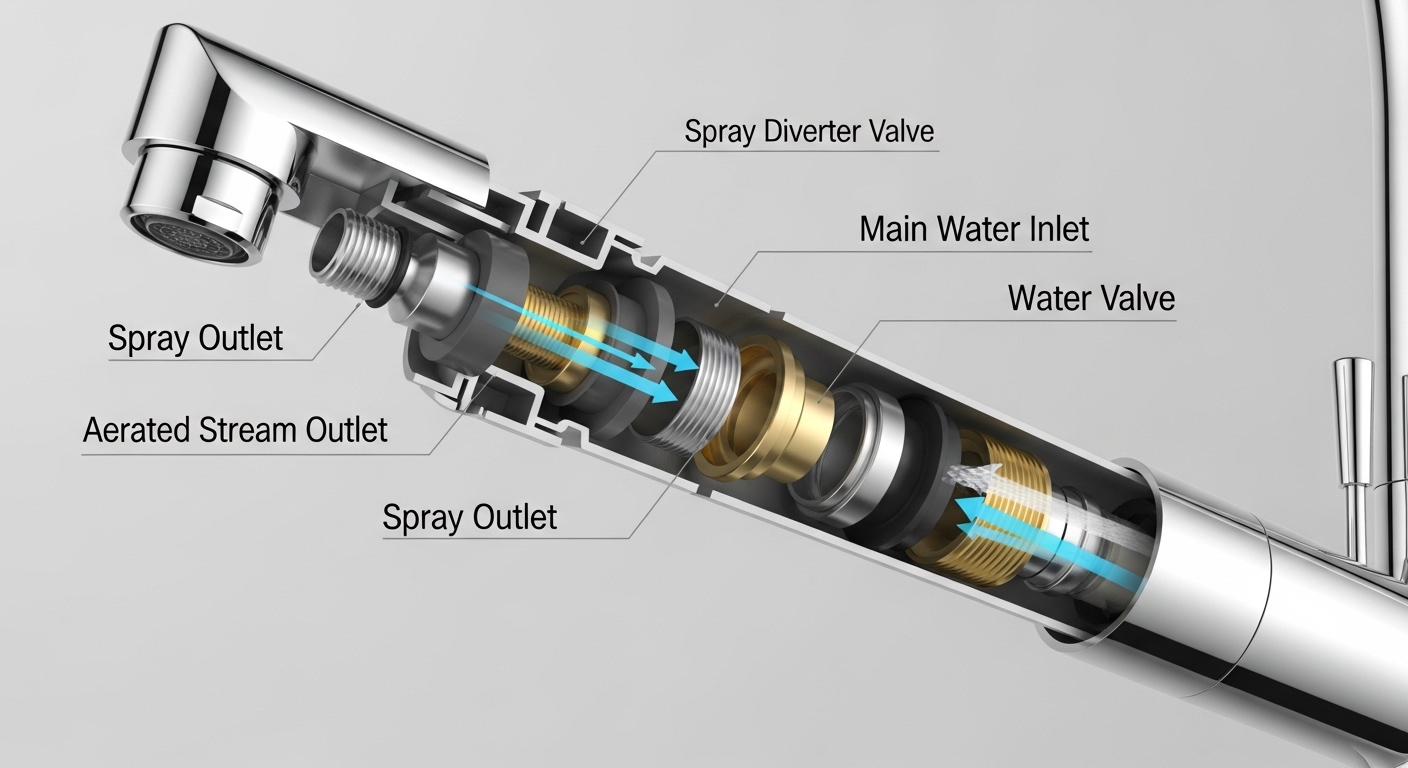
If your sprayer has gotten weak, your faucet leaks from the spray head and the stream at the same time, or the button just won’t toggle, the part you’re looking for is the faucet spray diverter. It’s one of the most common failure points in a modern kitchen faucet, and one of the easiest to fix once you understand what it does. This guide walks through exactly how a diverter works, how to tell when yours is bad, how to choose the right replacement, and when it’s smarter to replace the whole faucet instead.
At Fransiton, we design and pressure-test the diverter mechanisms in our own pull-down kitchen faucets, so the fixes and specs below come from hands-on bench testing — not guesswork copied from a spec sheet.
What exactly is a faucet spray diverter and what does it do?
A faucet spray diverter is a spring-loaded valve — usually a small plastic or brass cartridge about the size of your thumb — that sits inside the spray head or spout body and decides where the incoming water goes. Push the button once, water is routed to the aerated stream; push it again, water is redirected to the spray jets. That switching is the diverter’s entire job.
Here’s the mechanical logic in plain terms. Water comes up a single supply line into the spray head. Left alone, it takes the path of least resistance out the main aerator. When you press the toggle, you close off that main path and force the water sideways through a set of tiny spray holes. A small internal spring holds the diverter in whichever position you last selected. Because it’s constantly moving under water pressure and catching mineral debris, it’s a wear part — think of it like the switch in a two-way garden hose nozzle, just miniaturized and living inside your faucet.
Two clarifications people always ask about:
- A diverter is not the same as an aerator. The aerator is the mesh screen at the very tip that mixes air into the stream and sets your flow rate; the diverter is upstream and controls which outlet the water leaves from. If you’re getting confused between the two, our full faucet aerator guide breaks down where each part lives.
- Not every faucet has one. A basic single-mode faucet with no spray button has no diverter. Diverters only exist where there are two or more spray modes to switch between.
How do I know if my spray diverter is bad? (5 telltale symptoms)
You almost certainly have a failing diverter if water comes out of both the stream and the spray at the same time, or if pressing the mode button does nothing. Those two symptoms alone account for the large majority of diverter failures we see returned for warranty inspection.
Run through this checklist. If two or more apply, the diverter is the prime suspect:
- Water leaks from the spray and stream simultaneously. The classic sign. The diverter can no longer fully seal one path, so water dribbles from both.
- The spray mode is weak or barely trickles even though the main stream is strong. Sediment is partially blocking the diverter’s spray port.
- The button won’t toggle or springs back on its own. The internal spring or seat has worn out.
- Water sprays back up into the spray head housing and drips from the underside where the hose connects.
- Pressure dropped across the board after you already cleaned the aerator — the restriction is deeper in, at the diverter.
One quick diagnostic before you buy anything: unscrew and clean the aerator first. A clogged aerator mimics several of these symptoms, and it’s a 2-minute fix. If cleaning the aerator doesn’t restore normal switching, the diverter is the real culprit. And if you’re chasing a leak that’s actually coming from the base or handle rather than the spray head, that’s a different repair — see our guide on how to fix a dripping kitchen sink faucet to rule that out first.
Where is the spray diverter located, and are there different types?
The diverter lives in one of two places depending on your faucet design: inside the spray head itself (most pull-down faucets) or down in the faucet body/spout base (most older or side-sprayer faucets). Knowing which type you have determines how you access it.
Here’s how the common configurations compare:
| Diverter type | Where it lives | Found on | Access difficulty |
|---|---|---|---|
| Spray-head diverter (cartridge) | Inside the pull-down/pull-out spray wand | Most modern pull-down kitchen faucets | Easy — unscrew spray head |
| Spout-body diverter | Base of the spout, under the spray head socket | Some pull-down and high-arc faucets | Moderate — remove spray head + hose |
| Side-sprayer diverter | Under the spout, in the faucet body | Faucets with a separate side spray hose | Harder — access from under sink |
| No diverter | N/A | Single-function bar/prep faucets | N/A |
For the vast majority of homeowners with a modern pull-down faucet, it’s the first row: a self-contained diverter cartridge that unscrews right at the spray head with no tools and no trip under the sink. That’s the scenario the repair steps below assume.
How do you replace a faucet spray diverter step by step?
You replace a spray-head diverter by shutting off the water, unscrewing the spray head from the hose, popping out the old diverter cartridge, dropping in the matching new one, and reassembling — typically 15 minutes, no plumber required. Here’s the full sequence.
- Shut off the water. Close both supply valves under the sink and open the faucet to relieve pressure. This matters even for a spray-head repair so you don’t get sprayed.
- Detach the spray head. Pull the wand out and unscrew it from the quick-connect hose or the spout. Most thread off by hand; a strap wrench helps if it’s stuck. Let the hose retract gently — don’t let the weight slam it back down.
- Locate the diverter. Look inside the base of the spray head (or the top of the spout socket). You’ll see the diverter cartridge, sometimes held by a small clip, O-ring, or friction fit.
- Remove the old diverter. Pry or pull it straight out with needle-nose pliers or a small flathead. Note its orientation before it comes free — snap a phone photo.
- Clean the cavity. Wipe out mineral grit and check the O-rings. Hard water scale is the number-one killer of diverters, so a clean seat helps the new part last.
- Install the new diverter. Seat the matching replacement in the same orientation until it clicks or bottoms out. Add a dab of silicone plumber’s grease to the O-rings.
- Reassemble and test. Screw the spray head back on, turn the water back on slowly, and cycle the button several times. The stream and spray should now switch cleanly with no cross-leak.
If you’ve never opened up a faucet before, the mechanics here are gentler than a full swap — and if you do decide the whole fixture is due, our walkthrough on how to install a kitchen faucet step by step covers the bigger job.
Can you fix a spray diverter without replacing it, or should you just buy a new one?
Yes — if the failure is caused by mineral buildup rather than worn parts, you can often revive a diverter by cleaning it, no new part needed. Try cleaning first; replace only if cleaning doesn’t restore clean switching or if the plastic is cracked or the spring is shot.
To clean a diverter: remove it as above, soak it in a 50/50 white vinegar and warm water solution for 20–30 minutes to dissolve scale, work the moving parts gently, rinse thoroughly, and reinstall. On roughly a third of the diverters we inspect, a good vinegar soak is all it takes. If your faucet is generally plagued by scale, our guide on cleaning hard water stains from a faucet covers the prevention side so you’re not doing this every six months.
Here’s the honest decision framework on repair versus replace:
- Clean it if the part looks intact and the symptom is weak spray or sluggish switching — most likely scale.
- Replace the diverter ($5–$15) if it’s cracked, the spring is weak, or cleaning didn’t fix cross-leaking. Match the part to your faucet brand and model — diverters are not universal.
- Replace the whole faucet if the faucet is 10+ years old, the replacement diverter is discontinued, the spray hose is also cracking, or the finish is failing. At that point you’re throwing good money at a dying fixture.
How do you choose the right replacement diverter (and does brand matter)?
Match the diverter to your exact faucet brand and model number — diverters are proprietary, and a mismatched cartridge either won’t seat or won’t seal. Your fastest path is the model number stamped under the spray head or printed on your original paperwork; failing that, take the old diverter to match it by shape.
What to check when buying a replacement:
| Spec to verify | Why it matters |
|---|---|
| Faucet brand + model | Diverters are proprietary; wrong model won’t seat or seal |
| O-ring size and count | A worn O-ring, not the valve, may be your actual leak |
| Material (plastic vs. brass) | Brass-body diverters resist scale and heat better in hard-water homes |
| Spring tension | Weak springs cause auto-reverting buttons |
| OEM vs. generic | OEM guarantees fit; generics vary — read fit reviews carefully |
Our recommendation: buy the OEM diverter for your faucet whenever it’s available. The $3 you save on a generic isn’t worth a return trip and a second teardown when it doesn’t seal. If you own a Fransiton pull-down faucet, replacement diverters are matched to the exact model and covered under our parts program — no guessing on fit.
Do touchless and high-end faucets have spray diverters too?
Yes — touchless and smart faucets still use a mechanical spray diverter for the stream-versus-spray switch; the electronic sensor only controls water on/off, not which outlet it exits. So even a premium motion-activated faucet can develop the same diverter symptoms as a $60 model.
The difference is that better faucets tend to use brass-bodied diverters and higher-grade O-rings that shrug off hard water longer, and they’re backed by longer warranties. If you’re shopping in that tier, it’s worth confirming the diverter is a serviceable replaceable part and not sealed into the head — a detail we cover in our roundup of the best smart touchless kitchen faucet options for 2026. A cheap faucet with a non-replaceable diverter becomes landfill the day the diverter fails; a serviceable one lasts a decade.
How long should a spray diverter last, and how do I make mine last longer?
A quality spray diverter should last 5–10 years, but in hard-water homes without maintenance it can start failing in as little as 2–3 years. The single biggest factor is mineral scale, so the maintenance that extends diverter life is the same maintenance that keeps your whole faucet healthy.
Three habits that meaningfully extend diverter life:
- Descale twice a year. A quick vinegar soak of the aerator and diverter clears the scale before it locks the valve.
- Don’t leave the faucet in spray mode 24/7. Returning it to stream mode relieves pressure on the spray-side seals between uses.
- Address hard water at the source if you’re on well water or a high-mineral municipal supply — it protects diverters, aerators, and cartridges alike.
FAQ
What is a faucet spray diverter in simple terms?
It’s the small spring-loaded valve inside a pull-down or pull-out faucet that switches the water between the regular aerated stream and the spray jets when you press the mode button. It only exists in faucets that have more than one spray mode.
Why is water coming out of both the stream and spray at the same time?
That’s the classic sign of a failed diverter — it can no longer fully block one water path, so water leaks from both outlets. Try cleaning the diverter in vinegar first; if the cross-leak continues, replace the diverter cartridge.
Can I fix my spray diverter myself, or do I need a plumber?
On most modern pull-down faucets you can fix it yourself in 15–20 minutes with no special tools — the diverter unscrews right at the spray head. You only need a plumber if the diverter is buried in the faucet body and requires under-sink access you’re not comfortable with.
Are faucet spray diverters universal?
No. Diverters are proprietary to each faucet brand and often to specific models. Always match the replacement to your faucet’s brand and model number, or bring the old diverter with you to compare the shape, O-rings, and dimensions.
How much does a replacement spray diverter cost?
A replacement diverter cartridge typically costs $5–$15 for the part. Since it’s a DIY-friendly repair, that’s usually your total cost — far cheaper than replacing the whole faucet, which only makes sense if the fixture is old or the part is discontinued.
Will a bad diverter reduce my water pressure?
It can. When scale partially blocks the diverter’s ports, it restricts flow to the spray mode and sometimes the stream too. If you’ve already cleaned the aerator and pressure is still low, the diverter is the next thing to check.
Author note: This guide was written and bench-tested by the Fransiton product team. Fransiton designs, manufactures, and pressure-tests its own pull-down kitchen faucets, and every diverter mechanism we ship is cycle-tested against industry durability standards and backed by our parts warranty. When we quote a repair time or a failure symptom, it’s from teardown data on real returned units — not a rewritten spec sheet.