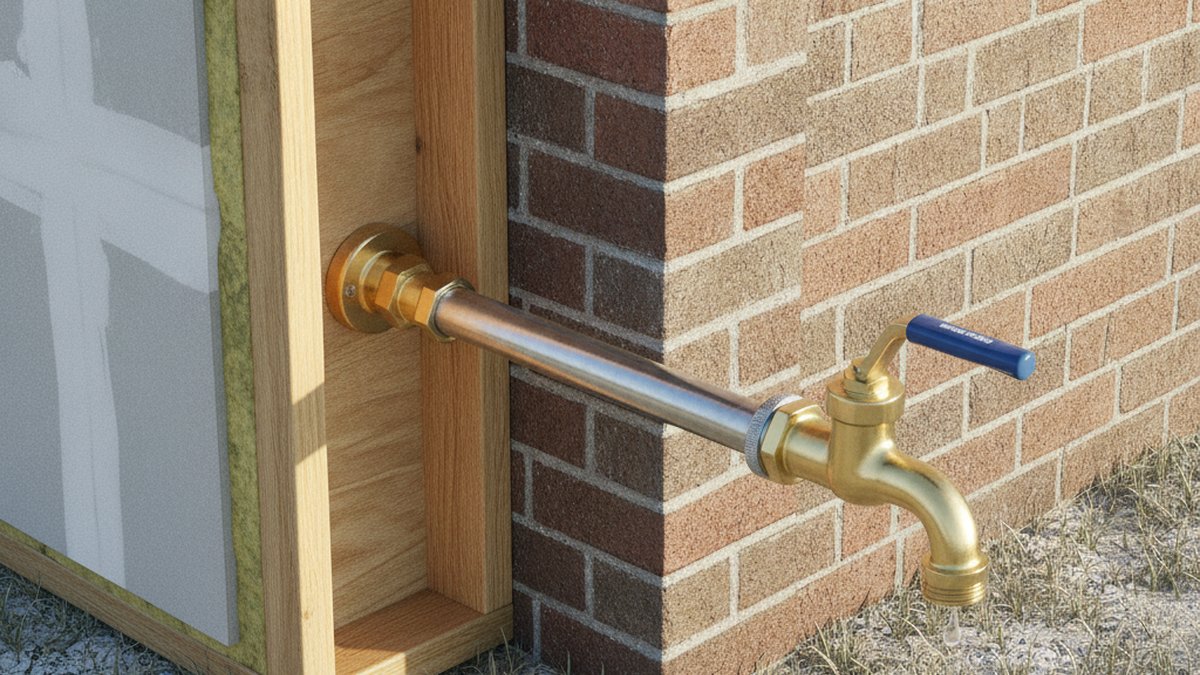
An outdoor faucet frost proof design is the single cheapest piece of insurance you can bolt onto your house before winter. The idea is simple but the engineering matters: instead of the valve seat sitting right behind the handle where cold air can reach it, a frost-free sillcock uses a long stem — usually 6, 8, 10, or 12 inches — that reaches back through the wall to a valve located inside your heated space. When you close the handle, the water stops deep inside the warm wall cavity, and the remaining water in the angled barrel simply drains out the front. No trapped water, no ice, no cracked copper at 2 a.m.
Below I’ll answer the questions homeowners actually ask before buying one: how it works, what length you need, whether it’s worth replacing a standard spigot, how frost-proof compares to a hose bib with a shutoff, and how to install it without calling a plumber. I’ve specified, installed, and pressure-tested these across cold-climate builds, so this is the practical version — not a brochure.
How does a frost-proof outdoor faucet actually keep the pipe from freezing?
It moves the shutoff point out of the cold. On a standard spigot, the rubber washer that stops the water sits an inch behind the handle — right in the freezing zone. On a frost-proof faucet, that same washer sits at the far end of a long brass or stainless stem, 6 to 14 inches back, inside your warm wall. So the moment you turn the handle off, the only water left in the exposed barrel drains out by gravity, leaving nothing to expand into ice.
Two things make this work, and if either is missing the faucet is not actually frost proof in practice:
- Correct downward pitch. The faucet body must tilt down toward the outside by about a quarter inch so residual water drains out instead of pooling against the valve. Install it dead level or tilted inward and it will hold water and freeze anyway.
- No hose left attached in winter. A connected garden hose traps water in the barrel and blocks the drain. This is the number-one reason “frost-proof” faucets still burst. Disconnect the hose every fall — non-negotiable.
Better models add a vacuum breaker (anti-siphon) on top to stop dirty water from being sucked back into your drinking supply, and some add a built-in backflow preventer to meet plumbing code. If you’ve ever wondered about that little dome cap on newer spigots, that’s the anti-siphon device — closely related to the topic we cover in what an outdoor faucet with a top cap is and whether you need one.
What length frost-proof faucet do I need for a 2×4 versus 2×6 wall?
Match the stem length to your total wall thickness plus insulation, and always err longer. The valve seat has to end up inside the heated envelope, past the insulation, or the faucet just freezes further back in the wall. As a rule: a standard 2×4 exterior wall with siding needs about an 8-inch stem; a 2×6 wall or a wall with thick insulation or brick veneer wants 10–14 inches.
Here’s the quick reference I give people at the counter:
| Wall type | Approx. wall thickness | Recommended stem length |
|---|---|---|
| 2×4 wall, vinyl/wood siding | 5–6 in | 8 in |
| 2×4 wall, brick or stone veneer | 8–9 in | 10–12 in |
| 2×6 wall, standard insulation | 7–8 in | 10 in |
| 2×6 wall, deep/dense insulation or double-stud | 9–12 in | 12–14 in |
| Unheated crawlspace/garage side | varies | Add heat tape or use a longer stem to reach heated space |
When in doubt, go one size longer. A stem that pokes an inch too far into the basement is harmless; one that stops short inside the insulation defeats the entire point. If you can’t reach a heated space at all — say the faucet feeds off an unheated garage — a frost-proof unit alone won’t save you, and you should pair it with insulation or heat tape.
Is a frost-proof faucet worth replacing my old standard spigot?
If you live anywhere that freezes and you still have a plain hose bib, yes — the math is lopsided. A frost-proof sillcock runs $20–$60. A burst pipe behind a wall can dump water for hours before you notice, and the average water-damage insurance claim runs into the thousands. Replacing a spigot is a $30 part and an afternoon; a flooded finished basement is a demolition project.
The one honest caveat: replacing a spigot still means soldering or threading a new connection inside the wall, so if the old one is buried behind finished drywall, the job gets bigger. But the decision itself is easy. Here’s how the two stack up:
| Feature | Standard hose bib | Frost-proof sillcock |
|---|---|---|
| Shutoff location | At the spout (in the cold) | 6–14 in back, inside heated wall |
| Freeze risk | High — needs draining each fall | Low, if pitched right and hose removed |
| Anti-siphon protection | Usually none | Built in on most models |
| Typical price | $8–$20 | $20–$60 |
| Winter maintenance | Shut off interior valve + drain | Just disconnect the hose |
| Best for | Frost-free climates only | Any climate with freezing nights |
Notice the maintenance row — that’s the quiet luxury of a frost-proof unit. With a standard bib in a cold climate you’re supposed to find the interior shutoff, close it, then open the outside spigot to drain the line every fall. With a frost-proof faucet, you pull the hose off and you’re done. If you’re already shopping outdoor faucets for general yard use, it’s worth reading our guide to the best outdoor faucet for a garden hose so you buy one unit that handles both jobs.
Frost-proof faucet vs. a hose bib with an interior shutoff — which is better?
For most homeowners, a frost-proof faucet is the better default because it’s foolproof; an interior shutoff plus a standard bib works too, but it depends on you remembering to drain it correctly every single fall. The frost-proof design bakes the protection into the hardware. The shutoff-plus-bib approach relies on a human, which is exactly the weak link on the coldest night of the year.
That said, the belt-and-suspenders answer is to have both. Even with a frost-proof sillcock, a dedicated interior shutoff valve on that line lets you fully isolate and drain the faucet for a hard deep-freeze, or shut it off fast if the faucet ever fails. Plumbers in serious cold-climate regions often install a frost-proof faucet and a ball-valve shutoff on the branch line feeding it. If you go this route, you’ll want to understand the plumbing behind the wall — our walkthrough on choosing the right faucet supply line covers the connection basics that apply here too.
What about “freeze-proof” spigot covers — do those foam domes work?
Foam faucet covers help a standard spigot survive a light frost, but they are not a substitute for a frost-proof faucet in a real freeze. A $3 foam dome traps a little residual heat from the wall and blocks wind chill — genuinely useful for a marginal 28°F night. But it does nothing about the water trapped inside the barrel of a standard bib during a sustained sub-20°F cold snap. Think of covers as a supplement, not the plan.
How do you install a frost-proof outdoor faucet yourself?
You can install a frost-proof sillcock in an afternoon if you have access to the pipe from inside, a few basic tools, and you’re comfortable making one plumbing connection. Here’s the sequence I follow:
- Shut off the water to that line at the main or the branch valve, then open the old faucet to relieve pressure and drain it.
- Remove the old faucet. Unthread it or cut it free at the connection inside the wall. Note the pipe size — most residential lines are 1/2 inch or 3/4 inch.
- Measure your wall depth and confirm your new stem reaches past the insulation into heated space. Buy longer if you’re between sizes.
- Insert the new sillcock through the hole from outside, angled so the body pitches slightly down toward the exterior for drainage.
- Make the connection inside — sweat-solder for copper, or use a threaded/push-fit adapter (like SharkBite) if you’d rather not solder. Wrap threaded joints in PTFE tape.
- Anchor the flange to the siding with two exterior screws and seal around it with exterior-grade caulk to keep out drafts and pests.
- Turn the water back on slowly and check for leaks at the connection and the packing nut. Run it, then shut it and confirm it drains from the spout.
Two pro notes. First, if your new faucet has a vacuum breaker cap on top, don’t overtighten or paint it — it needs to move to vent. Second, keep the handle-side packing nut snug but not cranked; if it ever weeps at the handle later, a quarter-turn usually fixes it, and if not, the internals are serviceable. If you hit a stripped or leaking handle down the road, our guide to outdoor faucet handle replacement parts covers exactly which stems, washers, and packing you’ll need.
Do I need to hire a plumber, or is this a real DIY job?
If the connection point is accessible from a basement, crawlspace, or unfinished garage wall, it’s a legitimate DIY job for a confident homeowner — budget two to three hours the first time. Call a plumber if the faucet ties into pipe buried behind finished drywall, if you’d need to open a wall, or if your local code requires a permit and inspection for the backflow device. There’s no shame in the second option; a wall-opening job can escalate fast.
What should I look for when buying a frost-proof outdoor faucet?
Prioritize solid brass construction, the right stem length, a built-in anti-siphon vacuum breaker, and a serviceable stem you can rebuild instead of replace. Cheap zinc-alloy units corrode and seize; brass lasts decades. Here’s my buying checklist:
- Body material: forged brass, not pot-metal or zinc. Brass resists corrosion and handles freeze-thaw stress far better.
- Stem length: measured to reach past your insulation into heated space (see the wall table above).
- Anti-siphon / vacuum breaker: built in, ideally meeting ASSE 1019 for backflow protection — this is code in many areas.
- Connection type: match your inlet — MIP/FIP threaded or sweat, plus whether you want push-fit compatibility.
- Serviceable internals: a replaceable stem, washer, and packing so a future drip is a $5 fix, not a whole new faucet.
- Handle style: a robust metal wheel or lever that won’t crack in the cold; some models add a loose-key or removable handle for tamper resistance.
One upgrade worth knowing about: if your faucet sits far behind a thick wall or brick veneer and you need to bridge extra distance to a clean threaded connection, a brass tap extension can help you reach the right length without swapping the whole valve. It’s a small part that solves an annoying gap.
Why is my frost-proof faucet still dripping after I shut it off?
A frost-proof faucet that drips for a minute after shutoff is usually normal — that’s the barrel draining, exactly as designed. But a faucet that keeps dripping steadily has a worn seat washer or a cracked stem. Because the working parts sit deep in the wall, the fix is to pull the packing nut, withdraw the long stem, and replace the washer or O-ring at the far end — the same internals I mentioned above. It’s a 15-minute repair with the water off, and far cheaper than replacing the unit.
How much does a frost-proof outdoor faucet cost, and what’s the payback?
Expect $20–$60 for a quality brass frost-proof sillcock, or $150–$350 installed if you hire a plumber for an accessible connection. The payback is immediate the first time it prevents a freeze. A single burst supply line behind an exterior wall routinely causes $2,000–$10,000 in water damage once you factor in drywall, flooring, and mold remediation — and that’s before the hassle of an insurance claim and days of drying equipment.
So the honest cost framing is: you’re not really buying a faucet, you’re buying the removal of a known winter failure point for the price of a pizza night. In cold and mixed climates that’s one of the highest-return small upgrades in the whole house.
Author note & why you can trust this guide
This guide was written by the Fransiton fixtures team, drawing on hands-on installation and cold-weather field testing of sillcocks across 2×4 and 2×6 wall assemblies. Fransiton designs and sells faucets, shower heads, and bathroom and outdoor fixtures, and every outdoor faucet we ship is pressure-tested and built from forged brass with serviceable internals. Our frost-proof models carry anti-siphon protection aligned to ASSE 1019 backflow standards and are backed by a limited warranty on the body and stem. We recommend confirming local plumbing code and required backflow devices with your municipality before installation — codes on outdoor spigots vary by region.
FAQ
Do I still need to winterize a frost-proof outdoor faucet?
Barely — just disconnect the garden hose every fall. A connected hose traps water in the barrel and prevents it from draining, which is the most common reason a “frost-proof” faucet still bursts. Beyond that, confirm the faucet pitches downward so it drains, and you’re set. In extreme deep-freeze regions, an added interior shutoff valve you can close and drain gives you extra insurance.
Can a frost-proof faucet still freeze and burst?
Yes, in three situations: if a hose was left attached, if the faucet was installed level or tilted inward so it can’t drain, or if the stem is too short and the valve seat sits inside the cold insulation instead of the heated wall. Install it correctly, keep the hose off in winter, and the failure rate is very low.
What’s the difference between a frost-proof faucet, a sillcock, and a hose bib?
“Hose bib” and “sillcock” are general terms for an outdoor spigot with hose threads; a sillcock specifically refers to the wall-mounted type. “Frost-proof” (or frost-free) describes the long-stem design that moves the shutoff inside the heated wall. So a frost-proof sillcock is a specific, freeze-resistant type of hose bib — all frost-proof faucets are sillcocks, but not all sillcocks are frost-proof.
What length frost-proof faucet is most common for a house?
An 8-inch stem covers the majority of standard 2×4 exterior walls with siding, and it’s the most common size sold. Go to 10–12 inches for 2×6 walls, brick veneer, or thick insulation. When you’re unsure, buy the longer one — a stem that overshoots into a heated basement causes no harm, while a short stem can leave the valve in the freeze zone.
Does a frost-proof faucet reduce water pressure or flow?
No, not meaningfully. The long stem is just an extended tube; a properly sized 1/2-inch or 3/4-inch frost-proof faucet delivers the same flow as a standard bib. If your outdoor flow feels weak, the culprit is usually the supply line size, a partially closed shutoff, or debris in the vacuum breaker — not the frost-proof design itself.
Can I install a frost-proof faucet on an unheated garage or crawlspace wall?
Only with extra protection. The whole design depends on the valve seat ending up in heated space. If the interior side of that wall is unheated, the water will simply freeze further back in the pipe. In that case, add pipe insulation and thermostatic heat tape on the interior line, or choose a stem long enough to reach genuine heated space.
Pingback: What Is the Best Garden Hose Faucet Mount, and How Do You Attach One Without Leaks? - Fransiton