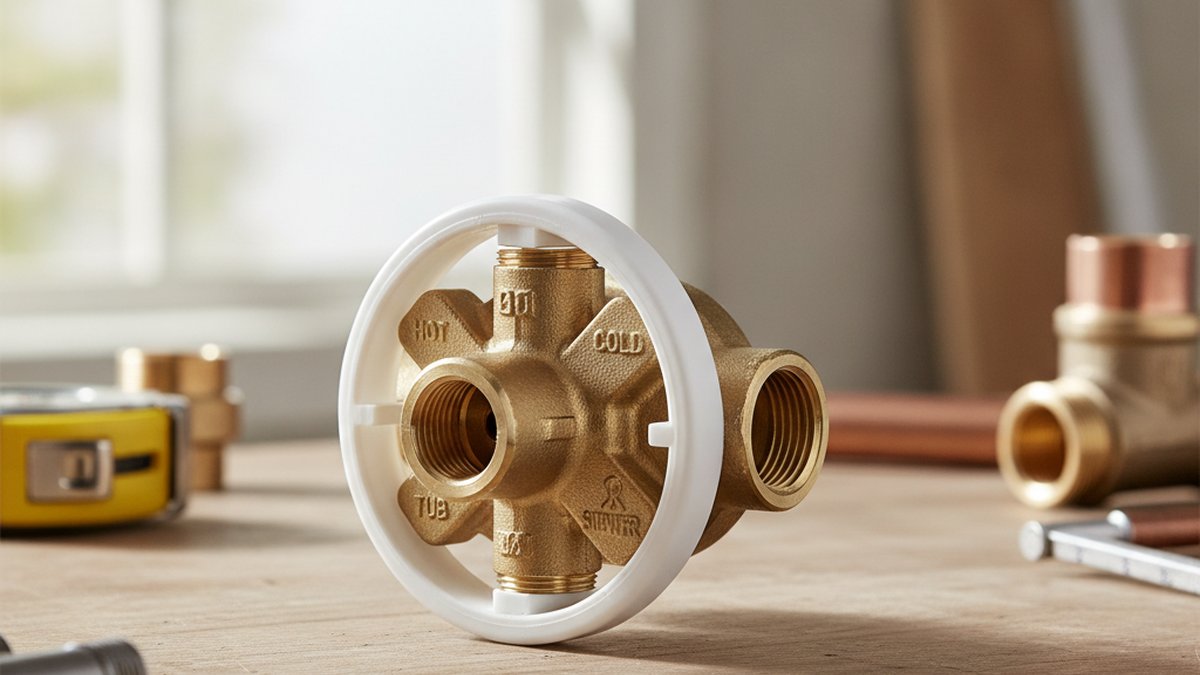
Learning how to install a Delta shower faucet valve is one of the most valuable plumbing skills you can pick up, because that valve is the heart of your entire shower — every drip, temperature swing, and pressure problem traces back to it. The good news: Delta designed its MultiChoice Universal system specifically so a careful homeowner can rough it in once and never open the wall again, even if you change the trim style years later. This guide walks you through the whole job the way a working plumber would explain it to you over the fence — no fluff, just what actually matters.
Before you touch a wrench, know which system you have. Delta uses the same universal valve body across almost its entire line, and understanding that is what makes this install forgiving instead of frustrating.
What Delta shower valve do I actually need — R10000 or something else?
For almost every standard shower or tub/shower remodel, you want the Delta R10000-UNBX MultiChoice Universal valve body. This is Delta’s “rough-in” valve: it’s the part that gets buried in the wall, and it’s intentionally sold separately from the trim (the handle and escutcheon you see). The genius of the system is that one universal body accepts almost any Delta trim kit — 14 Series, 17 Series, 17T Series — so you can rough in now and decide on finish and features later.
Here’s how the main options break down so you buy once:
| Valve / Trim Type | What It Does | Best For | Pressure/Temp Protection |
|---|---|---|---|
| R10000-UNBX (universal body) | Rough-in valve, no stops | Standard installs behind a wall with accessible shutoffs | Depends on trim cartridge |
| R10000-UNWS (universal body with stops) | Same, with integral service stops | When you can’t easily shut water elsewhere | Depends on trim cartridge |
| 14 Series trim | Single handle, pressure-balance | Budget-friendly, most homes | Anti-scald pressure balance |
| 17 Series trim | Separate volume + temperature control | Users who want a memory temp setting | Pressure balance + temp limit |
| 17T Series trim | Thermostatic control | Precise, constant temperature | Thermostatic + pressure balance |
The takeaway: the body is universal, the cartridge and trim decide the features. Buy the R10000 body plus whichever trim series matches the shower experience you want. If your winters or water pressure swing a lot, spend up for 17 or 17T — the anti-scald protection is worth it.
What tools and materials do I need before I start?
You need soldering or push-fit tools, a level, and something to protect the finished wall — gather everything first so you’re not running to the store with the water off. Nothing here is exotic, but skipping the plumber’s tape or the emery cloth is how small leaks start.
- Delta R10000 MultiChoice Universal valve body (with or without stops)
- Delta trim kit (14/17/17T series) — buy the matching finish
- Propane torch, lead-free solder, flux, emery cloth or SharkBite/push-fit fittings if you don’t solder
- Copper pipe (½”) or PEX with the correct crimp/expansion tool
- Tubing cutter, adjustable wrench, channel-lock pliers
- Torpedo level and a tape measure
- PTFE thread-seal tape and pipe dope for threaded connections
- A bucket, rags, and a wet/dry vacuum for the inevitable trapped water
If you’re unsure what belongs in your kit, our rundown of the sink faucet install tools you actually need covers most of the same wrenches and cutters — a shower valve just adds a torch or a crimp tool to the list.
How do I set the valve depth so the trim fits the wall?
Set the valve so the finished wall surface lands between the two molded lines on the plaster guard — this is the single most important measurement of the whole job. Get it wrong and your handle either won’t reach the cartridge or will stand off the wall with an ugly gap, and no amount of trim will hide it.
The white plastic plaster guard that ships on the valve is your depth gauge, not just packaging. Delta molds two reference lines into it: your finished wall (tile, surround panel, or cement board plus tile) must fall in that window. Measure from the studs outward, account for backer board and tile thickness, and mount the valve to a cross-brace between studs at the height you want — typically 42 to 48 inches off the floor for the valve, higher for shower-only. Use your torpedo level and get the valve dead plumb; a crooked valve means a crooked handle forever.
One more thing people miss: the word “UP” is stamped on the valve body. Install it upside down and your hot and cold reverse and your pressure balance won’t function correctly. Always orient “UP” toward the ceiling before you sweat a single joint.
How do I connect the hot, cold, tub, and shower lines correctly?
Hot water connects to the left inlet, cold to the right, the shower riser goes out the top, and the tub spout drops out the bottom — Delta casts these positions right into the body, so you rarely have to guess. Getting the four connections right and leak-free is the core of the install.
Work through it in this order:
- Turn off the water at the home’s main and open a low faucet to drain the lines. Confirm nothing dribbles from the pipes you’re about to cut.
- Remove the cartridge before soldering. If you sweat the joints with the plastic cartridge and its rubber seals inside, the heat will melt them. Pull the cartridge, solder the body cold, then reinstall.
- Dry-fit everything first. Cut your copper or PEX to length, deburr, and test the layout with the valve clamped in place before you make anything permanent.
- Make the connections. Solder clean, fluxed joints, or push your SharkBite fittings fully home to the depth mark. For a tub/shower, connect the bottom port to the spout drop; for shower-only, cap or plug the bottom port per Delta’s instructions.
- Install the shower riser and drop-ear elbow for the shower arm up top, secured to blocking so it doesn’t wobble.
If you’re doing a full tub-and-shower and also touching the supply piping behind the tub, our guide on how to replace bathtub faucet pipes without flooding the bathroom pairs perfectly with this valve install and covers draining tricks that save your ceiling below.
How do I test for leaks before I close up the wall?
Turn the water back on with the cartridge installed and the valve in the OFF position, then inspect every joint for at least 15 minutes before you screw a single sheet of backer board over it. Closing the wall on an untested valve is the mistake that turns a 3-hour job into a drywall demolition.
Reinstall the cartridge, snap in the retaining clip (this clip is critical — skip it and pressure can push the cartridge right out), and restore water slowly. Watch the soldered or push-fit joints, the inlets, and the outlets. Then cycle the valve: run hot, run cold, run the tub, run the shower, and confirm the diverter sends water where it should. A pressure-balanced Delta cartridge should hold your temperature steady even if someone flushes a toilet — that anti-scald behavior is exactly what you’re paying for. Only when everything is bone dry under full pressure do you cover the wall.
While you’re testing, look specifically at the handle area and the escutcheon seal. If you ever see weeping there down the road, our fix for a Delta faucet leaking at the handle walks through the cartridge and O-ring cure, and a persistent drip from the head is covered in our guide to fixing a dripping shower faucet in under an hour.
Can I replace just the Delta valve without opening the whole wall?
Sometimes yes — if you’re replacing an existing Delta MultiChoice valve, you may be able to swap only the cartridge and trim through the existing access hole, no soldering required. This is the hidden superpower of the Delta system and the reason so many pros spec it.
If your old valve is already an R10000 body, you don’t touch the pipes at all: shut the water, pull the trim and retaining clip, extract the cartridge with the Delta removal tool, drop in a new cartridge, and reinstall trim. That’s a 20-minute job. You only need the full rough-in install described above when you’re building new, moving the valve, or replacing a non-Delta or older Delta 600-series body that isn’t compatible with modern universal trim.
When the body itself is failing or you’re relocating the shower, then yes — you’re opening the wall and following the full sequence. There’s no shortcut around a torch or crimp tool when the pipe connections themselves have to change.
Delta shower valve install: common mistakes to avoid
The three failures that send DIYers back into the wall are wrong valve depth, soldering with the cartridge in, and forgetting the retaining clip — avoid those and most installs go smoothly. A few more worth internalizing:
- Reversed hot/cold: installing the body upside-down or piping hot to the right. Double-check “UP” and left-hot/right-cold.
- No blocking behind the valve: a valve that flexes when you push the handle will crack joints over time. Secure it to solid backing.
- Overheating push-fit O-rings: keep the torch away from any nearby SharkBite fittings; the heat kills the seals.
- Skipping the pressure test: covered above, but it’s the number-one regret. Test first, tile second.
Author note, brand credibility & standards
This guide was written by the Fransiton fixtures team — we’ve been supplying and installing faucets, shower systems, and tub fittings for over a decade, and our product specialists field real installation questions from homeowners and contractors every day. We test the fixtures we sell against the finishes and pressure conditions North American homes actually see.
A note on standards: Delta’s pressure-balance and thermostatic cartridges are certified to ASME A112.18.1 / CSA B125.1 and the anti-scald standard ASSE 1016, which is why they hold temperature during pressure drops. Delta also backs the MultiChoice valve and most trim with a limited lifetime warranty on the original homeowner — one more reason to install it correctly and keep your receipt. Always follow the printed instructions in your specific R10000 and trim kit, as local plumbing code may require additional shutoffs or backflow protection.
FAQ
Do I need to solder to install a Delta shower valve?
No. You can use push-to-connect fittings like SharkBite or PEX with the correct crimp/expansion tool instead of soldering. Just remove the cartridge first if you do solder, and keep any torch heat away from push-fit O-rings. Push-fit is the friendliest route for a first-timer.
How high should I mount the Delta shower valve?
For a combined tub and shower, the valve typically sits 42–48 inches above the floor; for a shower-only setup, many installers place it higher, around 48–52 inches, for comfortable reach. The shower arm and head go up around 78–80 inches. Confirm the reach with everyone who’ll use the shower before you fix the height.
Can I use any Delta trim with the R10000 valve?
Yes — that’s the whole point of the MultiChoice Universal system. The R10000 body accepts Delta 14, 17, and 17T series trim, so you can rough in the valve now and choose or upgrade your handle, finish, and features later without opening the wall.
Why does my new Delta valve have no hot water or reversed temperature?
Almost always the body was installed upside-down or the hot and cold lines were swapped. Hot connects to the left inlet and cold to the right, with “UP” stamped toward the ceiling. If the piping is correct, check that the cartridge is seated fully and the retaining clip is engaged.
How long does it take to install a Delta shower faucet valve?
A full rough-in with new piping takes a confident DIYer about 2–4 hours, plus dry time if you’re tiling. Swapping only the cartridge and trim on an existing Delta MultiChoice body takes closer to 20–30 minutes with no soldering at all.
Do I need the plastic plaster guard after installation?
You keep it on during construction to set the correct wall depth and protect the valve from debris, then remove it when you install the finished trim. Don’t throw it away until the tile is done — it’s your depth gauge, and losing it early is how the trim ends up not fitting.