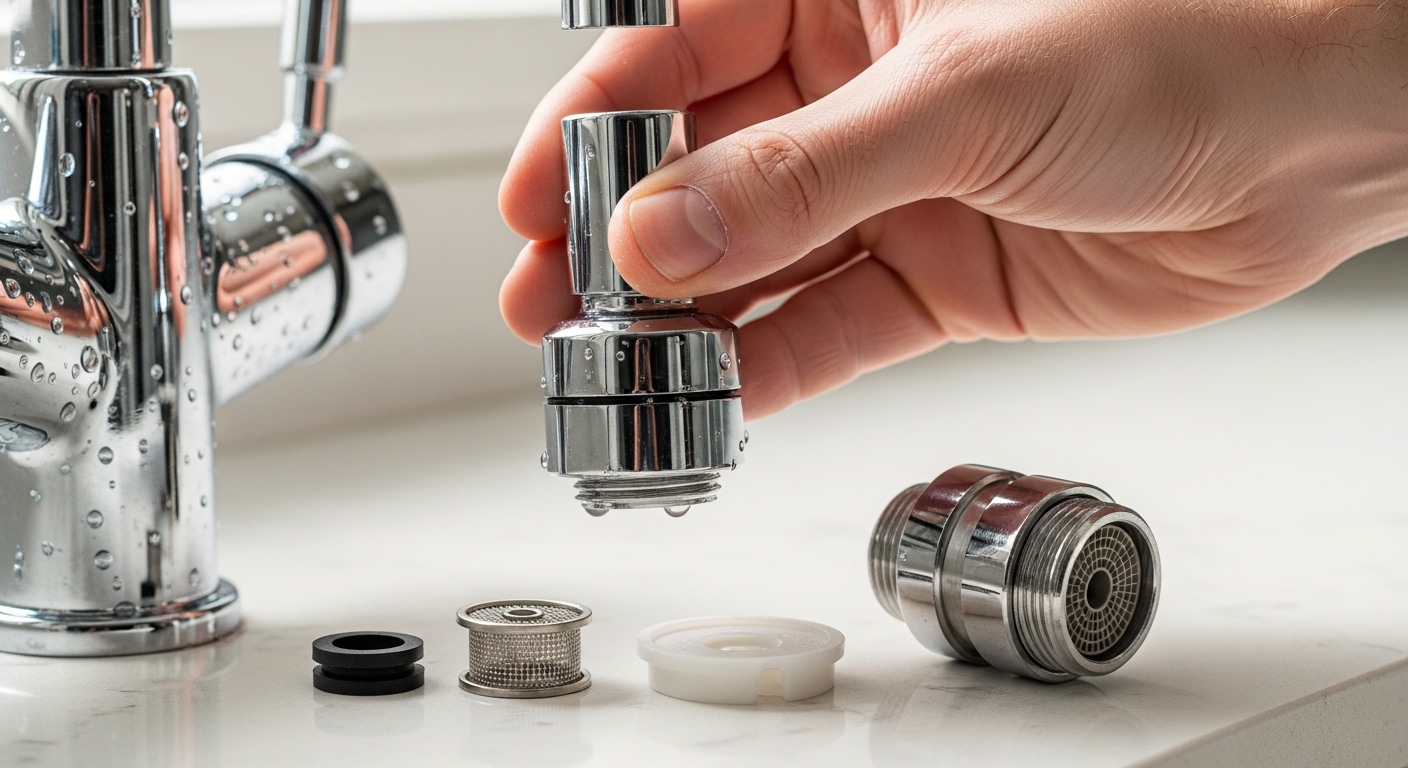
A kitchen faucet flow restrictor removal is one of the fastest, cheapest fixes for a faucet that trickles instead of flows — and you almost certainly already own the only tool you need. The flow restrictor is a small plastic or metal insert, often built into the aerator or the pull-down sprayer head, that deliberately limits how many gallons per minute (GPM) come out. Take it out and the water can move faster. But before you do, it helps to know exactly what you’re removing, whether weak pressure is even the restrictor’s fault, and what you give up when it’s gone. Let’s walk through all of it like a plumber standing at your sink would.
What exactly is a kitchen faucet flow restrictor, and where is it hiding?
A flow restrictor is a small disc — usually silicone, rubber, or plastic, sometimes with a tiny star-shaped or single center hole — that sits inside the water path to cap your flow rate. On most kitchen faucets it lives inside the aerator, the removable screw-on tip at the end of the spout. On pull-down and pull-out sprayers, it’s often tucked inside the spray head where the hose connects.
Federal rules cap kitchen faucets at 2.2 GPM at 60 psi, and some states go lower — California and Colorado, for example, require 1.8 GPM or less. The restrictor is how manufacturers hit those numbers. So when your faucet feels weak, that little disc is doing exactly what it was designed to do; it’s not broken. The question is whether it’s the right trade-off for your sink.
- In the aerator: the most common spot — a screw-on tip you can twist off by hand.
- In the pull-down/pull-out spray head: often behind a small screen or gasket where the head meets the hose.
- At the supply inlet: less common, but some faucets have a restrictor washer where the supply lines connect under the sink.
Is my weak water pressure actually the flow restrictor’s fault?
Not always — and this is the step most people skip. Before you remove anything, confirm the restrictor is the real culprit, because a clogged aerator, mineral buildup, or a half-closed shut-off valve produces the exact same weak, sputtering stream. Removing the restrictor won’t fix any of those.
Here’s a quick 60-second diagnosis. Unscrew the aerator entirely and turn the faucet on with the aerator off. If the water blasts out strong and full, your pressure is fine and the restrictor (or a clogged aerator screen) was the bottleneck — good candidate for removal or cleaning. If it’s still weak with the aerator completely off, the problem is upstream: a partly closed shut-off valve under the sink, a kinked supply line, sediment in the cartridge, or genuinely low house pressure. In that case, our guide on how to fix a dripping sink faucet in the kitchen and the broader faucet aerator guide will get you further than yanking out a restrictor ever would.
If your water is full of white, crusty mineral deposits, the fix might just be cleaning — soak the aerator and restrictor in white vinegar for a couple hours. Our walkthrough on how to clean hard water stains from a faucet covers the soak-and-scrub method that often restores flow without removing a single part.
How do you remove the flow restrictor step by step?
Removing the restrictor takes about five minutes and one common tool. Here’s the exact sequence for a standard aerator-mounted restrictor.
- Plug the drain. Drop in a stopper or a rag so small parts can’t disappear down the sink. The restrictor disc is tiny.
- Unscrew the aerator. Turn it clockwise as you look up at it (which is counter-clockwise from your normal viewpoint) — try by hand first. If it’s stuck from mineral buildup, wrap the aerator in a cloth or tape, then grip with slip-joint pliers so you don’t scratch the finish.
- Lay out the parts in order. Inside you’ll find a housing, a screen (or two), a rubber washer, and the flow restrictor — usually a colored plastic disc with a small hole or star pattern. Take a phone photo of the stack before you disturb it so reassembly is foolproof.
- Remove the restrictor disc. Pop it out with a flathead screwdriver, a toothpick, or a small pick. Keep it — don’t throw it away, in case you want to reverse the change.
- Reassemble everything else in the same order and screw the aerator back on hand-tight, then a gentle nudge with the pliers.
- Test and check for leaks. Run hot and cold. If the aerator drips around the threads, you left out the rubber washer or cross-threaded it — unscrew and reseat.
For a pull-down sprayer, unscrew the spray head from the hose instead; the restrictor and a filter screen usually sit right at that joint. Everything else is the same: remove the disc, keep the screen, reassemble.
One caution: never over-tighten with pliers. Kitchen faucet aerators and spray heads have delicate threads, and a cracked aerator housing means a new part. Hand-tight plus a quarter turn is plenty.
Should you actually remove it, or is that a mistake? (the honest trade-offs)
Remove the restrictor only if you’ve confirmed low flow is the problem and you’re okay using more water — otherwise, leave it in. It’s a real trade-off, not a free upgrade. Here’s the straight talk.
What you gain: a stronger, faster stream that fills pots and rinses dishes quicker. If your home has genuinely low water pressure (under about 40 psi), removing the restrictor can make a marginal faucet feel usable again.
What you give up: more water down the drain and a bigger water bill, plus more energy heating that extra hot water. A 2.2 GPM faucet run without its restrictor can jump well past 3 GPM. Over a year of dishwashing, that adds up. In water-restricted states, removing a restrictor can also put a fixture out of code compliance, which matters if you ever sell the home or need an inspection. And on high-efficiency faucets, the restrictor is sometimes what makes the aerator’s soft, splash-free stream work — pull it and you may just get a harder splashing jet, not a “better” one.
A middle path a lot of people miss: swap the restrictor for a slightly higher-flow aerator instead of removing flow control entirely. You keep a clean, aerated stream and gain flow, without the splash and waste of a wide-open spout.
Kitchen faucet flow restrictor removal vs. other flow fixes — which should you try?
If your goal is “more flow,” restrictor removal is only one of several fixes, and it’s not always the best one. Here’s how the common options stack up.
| Fix | Time & cost | Best when… | Downside |
|---|---|---|---|
| Remove flow restrictor | ~5 min, free | House pressure is low and you want max flow | Uses more water; may break code; possible splashing |
| Clean/soak the aerator | ~2 hrs soak, free | Stream is weak from mineral buildup | Fixes clogs only, not true low pressure |
| Swap to higher-GPM aerator | ~5 min, $5–$12 | You want more flow but a soft, splash-free stream | Small part cost; must match thread size |
| Open the shut-off valve fully | ~1 min, free | Valve under sink was partly closed | Only helps if that was the issue |
| Replace the whole faucet | ~1 hr, $80–$300+ | Faucet is old, corroded, or cartridge is failing | Biggest effort and cost |
If the diagnosis points to a worn-out or corroded faucet rather than just a restrictor, replacing the fixture is often the smarter long-term move — and it’s more approachable than people expect. Our step-by-step guide on how to install a kitchen faucet covers the whole job in about an hour.
Does removing the restrictor void your warranty or break the law?
In most cases removing a restrictor won’t void your faucet warranty, but permanently modifying flow can put the fixture out of local plumbing code — and that distinction matters. Manufacturer warranties typically cover defects in materials and finish, not whether you kept a wear-and-tear part like an aerator insert. Cleaning or swapping the aerator is considered normal maintenance.
The legal side is where to be careful. Federal law sets the 2.2 GPM max, and states like California, Colorado, Washington, and others enforce stricter limits (often 1.8 GPM). Those rules govern what can be sold and installed, and while nobody is inspecting your aerator day-to-day, a home inspection before a sale can flag a non-compliant fixture. If you live somewhere with water restrictions or drought rules, the responsible move is to keep flow at or below code — which is another argument for a compliant higher-flow aerator over a fully removed restrictor.
What if there’s no separate restrictor, or removing it didn’t help?
If you open the aerator and there’s no obvious disc — or you removed it and flow is still weak — the restrictor was never your problem, and the fix is upstream. Some modern faucets integrate flow control into the cartridge or the spray head in a way you can’t (and shouldn’t) modify. Others simply weren’t the issue.
Work through these in order:
- Check both shut-off valves under the sink are fully open (turn counter-clockwise all the way).
- Inspect the supply lines for kinks, and the little screens where they connect for sediment.
- Test hot vs. cold separately. If only one side is weak, the problem is that specific supply line or valve, not the faucet tip.
- Suspect the cartridge. A clogged or failing cartridge chokes flow and often causes drips too. If your faucet also drips or the handle feels off, that points at the cartridge or handle assembly.
If the faucet is also dripping or the handle wiggles, those are related symptoms worth ruling out — our guides on why a kitchen faucet knob is loose can save you from mistaking a hardware problem for a pressure problem.
Author note & why you can trust this guide
This guide was written and reviewed by the Fransiton product and testing team, which specializes in kitchen and bathroom fixtures. We bench-test aerators and flow rates against the U.S. federal 2.2 GPM standard and stricter state limits, and every Fransiton kitchen faucet ships with a documented flow rating and a manufacturer warranty covering materials and finish. Our recommendations here reflect hands-on disassembly of dozens of faucet and sprayer designs — not just spec sheets. When we say a fix takes five minutes, it’s because we’ve done it at the bench and at the sink.
FAQ
Will removing the flow restrictor damage my kitchen faucet?
No. The restrictor is a passive insert with no moving parts, and removing it doesn’t harm the faucet mechanism. The only real risk is cosmetic — scratching the aerator with pliers or cross-threading it on reassembly. Wrap the aerator in tape and hand-tighten to avoid both.
How much water pressure will I gain by removing it?
It depends on your home’s actual pressure, but you’ll typically see flow jump from around 2.2 GPM to 3+ GPM if house pressure is healthy. If your pressure is genuinely low, the gain is smaller because the restrictor wasn’t the main limit — the pipes and pressure were.
Can I put the flow restrictor back later?
Yes, as long as you keep the disc. That’s why we tell you not to throw it away. Just unscrew the aerator, drop the restrictor back into the same slot in the same orientation, and reassemble. It’s fully reversible in about five minutes.
Do all kitchen faucets have a removable flow restrictor?
Most do, but not all. Many faucets place the restrictor in the aerator or spray head where you can remove it, but some newer high-efficiency and touchless models integrate flow control into the cartridge or spray head in a way that isn’t meant to be modified. If you don’t find a disc in the aerator, it’s likely integrated — leave it alone.
Is it legal to remove the flow restrictor from my kitchen faucet?
Federal and state laws regulate the flow rate of faucets that are sold and installed, not the day-to-day condition of your aerator. Removing it isn’t policed in your home, but it can put the fixture out of local code, which may be flagged during a home inspection or sale — especially in water-restricted states like California and Colorado.
What’s better — removing the restrictor or replacing the aerator?
For most people, swapping in a higher-flow aerator ($5–$12) beats fully removing the restrictor. You gain flow while keeping a soft, splash-free, aerated stream and staying closer to code. Full removal makes sense mainly when house pressure is very low and you want maximum output.
Pingback: Tap Aerator UK Screwfix: Which One Should You Buy and How Do You Fit It? - Fransiton